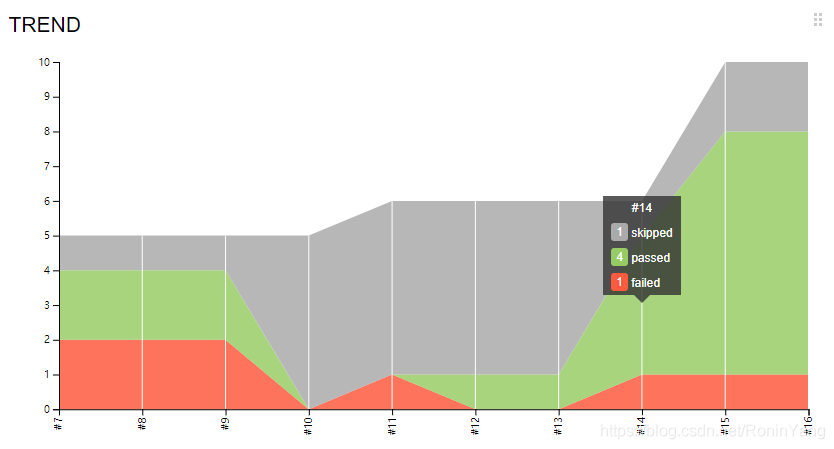
众所周知,allure趋势图在本地运行的时候,总是显示的空白,但与Jenkins集成后,生成的报告却显示了整个趋势。
如果不与Jenkins集成就真的没办法展示趋势图吗?
答案是NO,没有趋势图我们就自己写👀
一、首先看下Jenkins集成allure展示的趋势图是什么样子的

- 展示了每次运行的结果
- 对应构建的次数
- 点击可以跳转到对应的构建结果报告
- 整体趋势一目了然
二、研究Jenkins生成的allure报告有什么规律
1、打开家目录中的 .jenkins/jobs/test (test是Jenkins上的任务名称)

2、builds构建历史都在此文件夹中

3、进去每次构建的文件夹即可看到每次的构建结果

4、archive文件夹存放的就是每次生成的allure报告压缩包
5、解压后,找到 history-trend.json这个json里面存放的就是每次的构建结果,看名字就能得知 历史趋势

6、分析 history-trend.json文件的规律
- 整体的文件里面最外层是一个"列表"
- “列表"里面嵌套的是每次构建的历史,是一个"字典”
- 每一个"字典"里面又包含
buildOrder:构建次数reportUrl:报告的urlreportName:报告名称data:报告执行结果
7、再回过头看下我们自己生成的报告中的 history-trend.json
1)使用命令 allure generate test_allure_reports -o allure-reports --clean将报告转成一个静态工程

2)找到 history-trend.json

3)history-trend.json文件里面数据只有 data,并没有构建次数、报告url和报告名称
8、总结
- 每次生成报告的时候需要在
history-trend.json文件更新之前运行的结果 - 并且要在
history-trend.json文件中的每次生成报告的时候添加 构建次数和 报告url - 添加构建次数是为了使得趋势图能够按照顺序展示
- 添加报告url是为了使得点击趋势图可以进行跳转,查看历史报告
三、正式开始改造报告
目标:
- 每次的报告都要进行储存
history-trend.json里面的数据每次都要把历史的数据更新进去history-trend.json数据里面的"字典"需要添加至少两个"key":buildOrder、reportUrl、reportName(这个可要可不要)- 每次运行
buildOrder要增1,reportUrl是报告要访问的url history-trend.json数据要根据每个"字典"中的 buildOrder从大到小进行排序history-trend.json历史数据需要进行备份,方便新生成的报告进行历史数据写入
第一步:对每次生成的报告进行储存
 1
 2
 3
 4
 5
 6
 7
 8
 9
10
11
12
13
| # 生成Allure报告
# BASEDIR 是项目位置
# ALLURE_DIR是allure报告存放位置
# ALLURE_PATH 是根据当前时间戳生成allure报告
ALLURE_PATH = os.path.join(ALLURE_DIR, str(int(time())))
command = f'pytest {BASEDIR} -s --alluredir={ALLURE_PATH}'
os.system(command)
# 对生成的Allure报告进行进一步演进(生成一个相对独立的报告静态工程)
# ALLURE_PLUS_DIR 是存放要生成的报告
# buildOrder 是表示以构建次数为文件夹名称
command = f"allure generate {ALLURE_PATH} -o {os.path.join(ALLURE_PLUS_DIR,str(buildOrder))} --clean"
os.system(command)
|
第二步:获取历史数据和构建次数
 1
 2
 3
 4
 5
 6
 7
 8
 9
10
11
12
13
14
| def get_dirname():
hostory_file = os.path.join(ALLURE_PLUS_DIR, "history.json")
if os.path.exists(hostory_file):
with open(hostory_file) as f:
li = eval(f.read())
# 根据构建次数进行排序,从大到小
li.sort(key=lambda x: x['buildOrder'], reverse=True)
# 返回下一次的构建次数,所以要在排序后的历史数据中的buildOrder+1
return li[0]["buildOrder"]+1, li
else:
# 首次进行生成报告,肯定会进到这一步,先创建history.json,然后返回构建次数1(代表首次)
with open(hostory_file, "w") as f:
pass
return 1, None
|
第二步:更新备份历史数据 history.json和每个报告中的 history-trend.json
 1
 2
 3
 4
 5
 6
 7
 8
 9
10
11
12
13
14
15
16
17
18
19
20
21
22
23
24
25
26
27
28
29
30
| def update_trend_data(dirname, old_data: list):
"""
dirname:构建次数
old_data:备份的数据
update_trend_data(get_dirname())
"""
WIDGETS_DIR = os.path.join(ALLURE_PLUS_DIR, f"{str(dirname)}/widgets")
# 读取最新生成的history-trend.json数据
with open(os.path.join(WIDGETS_DIR, "history-trend.json")) as f:
data = f.read()
new_data = eval(data)
if old_data is not None:
new_data[0]["buildOrder"] = old_data[0]["buildOrder"]+1
else:
old_data = []
new_data[0]["buildOrder"] = 1
# 给最新生成的数据添加reportUrl key,reportUrl要根据自己的实际情况更改
new_data[0]["reportUrl"] = f"{allure_url}/{dirname}/index.html"
# 把最新的数据,插入到备份数据列表首位
old_data.insert(0, new_data[0])
# 把所有生成的报告中的history-trend.json都更新成新备份的数据old_data,这样的话,点击历史趋势图就可以实现新老报告切换
for i in range(1, dirname+1):
with open(os.path.join(ALLURE_PLUS_DIR, f"{str(i)}/widgets/history-trend.json"), "w+") as f:
f.write(json.dumps(old_data))
# 把数据备份到history.json
hostory_file = os.path.join(ALLURE_PLUS_DIR, "history.json")
with open(hostory_file, "w+") as f:
f.write(json.dumps(old_data))
return old_data, new_data[0]["reportUrl"]
|
第三步:调用顺序(需要使用 os.system进行执行命令行)
 1
 2
 3
 4
 5
 6
 7
 8
 9
10
| ALLURE_PATH = os.path.join(ALLURE_DIR, str(int(time())))
command = f'pytest {BASEDIR} -s --alluredir={ALLURE_PATH}'
os.system(command)
# 先调用get_dirname(),获取到这次需要构建的次数
buildOrder, old_data = get_dirname()
# 再执行命令行
command = f"allure generate {ALLURE_PATH} -o {os.path.join(ALLURE_PLUS_DIR,str(buildOrder))} --clean"
os.system(command)
# 执行完毕后再调用update_trend_data()
all_data,reportUrl = update_trend_data(buildOrder, old_data)
|
四、看下实现后的效果
趋势图

报告截图

五、跟Jenkins进行对比(一毛一样)😊


